

How To Link Apps To Google Home
The Google Assistant is a master at connecting to other devices in the smart home, with speakers like the Google Nest Mini and Nest Hub acting as a proxy to control lights, door locks, cameras and more.
However, learning how to add devices to your Google Home can be confusing to start with. Although Google's Seamless Setup feature will make adding certain devices much easier going forward.
How do you add devices, and which ones are even compatible? These are natural questions to ask when you're first starting out.
With this guide, we'll go through each step in detail. Before you know it, you'll be using your Google Nest speaker to control Philips Hue lights, change the temperature on your Google Nest thermostat and much more.
- Best Google Assistant compatible devices
- Essential Google Assistant commands
Add a device to your Google Home
Before we get started, we'll assume you already have a smart speaker with Google Assistant built in up and running. We'll also assume that your device isn't compatible with Seamless Setup - that's a very small list at the moment.
The important thing is that you've already got this hub device connected – the rest of your tech will be compatible with the Assistant, but won't actually listen to your voice commands.
In order to do this, you will have downloaded the Google Home app on your iOS or Android device.
1. Set up the device
First, set up the smart home device (bulbs, locks, etc.) according to the manufacturer's instructions. Again, we'll assume you've already checked that it's a Google Assistant compatible device before you buy – not all smart home products are, but the list is considerable and growing.
Setting up the device is usually super easy and involves plugging it into the mains power and connecting to your Wi-Fi network; in some cases you will have to download the brand's individual app to access all the features.
But once you've got going with voice, you may not need to deal with that app again.
It's also worth noting that if the device needs a bridge (like most Philips Hue or Ikea devices), you'll need to set this up first.
2. Add the device in the app

Next, open up the Google Home app. On the main screen, under where it says "Home", you'll see an 'Add' button. Tap on that, then click on 'Set up device', which has a blue plus sign next to it.
Here, you'll have two choices.
The first choice is setting up a new device, which is only for Google's own devices and Made for Google devices. If you proceed here, it'll scan your home for the device and then prompt you to join it to your Wi-Fi network.
Alternatively, if you have a device from a third party, like Philips Hue, then you need to click 'Have something already set up?' – you will see any devices that have already been linked listed here, grouped by brand, but you'll also be able to choose from a list of Works with Google brands to add your new kit.
Find the one you're looking for, select and follow the device maker's instructions. Usually, you'll just need to sign in to your account. You're expected to have installed the device before coming to this part of the process. Hit 'Done' when you're, well, done and the device will show up in the 'Devices' tab.
3. Rename devices in the Google app
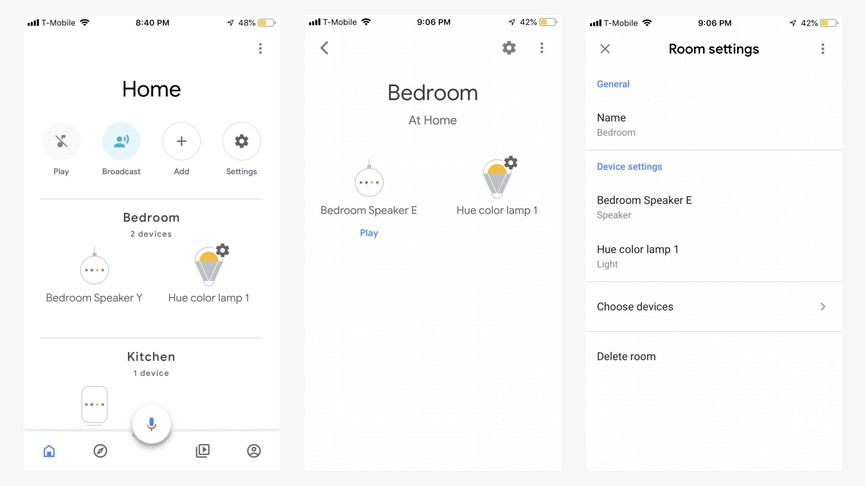
The Google Home app shows all your devices – categorized by room – on the home screen, giving you a much clearer overview of your smart home.
Tap on one of those devices. Depending on what it is, some controls may pop up – like a volume controller for a smart speaker – in which case, tap the cog icon in the top-right to go to the device settings.
You'll now see a place to name your device. With some devices, tapping on them from the home screen will take you straight to the device settings
You can change the name of the products to make it easier to control them with conversational voice commands, like 'big living room lamp', rather than annoying product names. Just tap the device you want to change, enter the new text, then hit 'Save'.
4. Add a device to a room
Where Alexa has Groups, Google Assistant has Rooms. Each of these is shown on the home screen, but you can choose what devices are assigned where.
To assign a device to a specific room, click on the name of the room on the home screen, then tap the cog icon in the top-right of the screen.
Select 'Choose devices' and you'll be able to add and remove as you please. Alternatively, you can click on an individual device and choose the room you want to assign it.
Want to add a new room? Tap on an existing device or a new one that's yet unassigned, hit the cog icon to go to the device settings, then tap on 'Room'. You'll see all the existing rooms plus loads more you can add instead.
And should you want to rename a room entirely, tap on the room name on the home screen, then go to the room settings via the cog icon, tap on the room name and enter whatever you please.

Adding smart lights with Google Seamless Setup
Those steps above are the process for 99% of all smart home devices. However, Google has recently introduced a feature called Seamless Setup, making the process of adding devices to your Google smart home a whole lot easier.
However, the list of compatible devices is pretty small so far and is limited to smart light bulbs.
However, expect to see this function being enhanced and expanded in the near future.
How To Link Apps To Google Home
Source: https://www.the-ambient.com/how-to/add-devices-google-assistant-441
Posted by: powershiste1968.blogspot.com
0 Response to "How To Link Apps To Google Home"
Post a Comment